Whether you’re trimming it yourself or preparing for a visit to your barber, having a good idea of what length you’re going for is so important. You’re about to learn everything you need to know about the 16mm haircut.
It’s a length that isn’t hard to keep tidy; it’s short, it’s simple, and it’s sleek.
But it’s long enough to give you some subtle and basic styling options. Not a lot – but some.
Here’s what you need to know.
You need to know what to use to trim it, what it’ll look like once it’s done, and how to trim it yourself.
Let’s get to it.
Which Clipper Guard Number For A 16mm Haircut?
The clipper guard number you need to produce the 16mm haircut is the number 5.
It will effortlessly trim down to exactly 16mm (⅝ of an inch).
You could call it a number 5 haircut instead; it doesn’t matter. It’s the exact same thing.
It’s important to remember that not all clippers will come with a #5 clipper guard. You need to check the product description before buying it to make sure it does.
Cheaper pairs of clippers often just come with #1 to #4 guards. If you’re looking to trim the length we’re discussing today, this won’t be enough.
Some clippers, usually the higher-end ones, also come with a lever on the side that can be pushed forward (closed) or backward (open).
Closing the lever will drop the blade and allow you to trim just a little bit shorter. Opening the lever will do the opposite.
Although this function is more important for barbers and for creating fades, it’s still a useful function to be aware of.
If you trim down to 16mm and feel like you want to trim just a little bit shorter without needing to commit to a #4 clipper guard, try closing the lever with the #5 guard on.
What Does A 16mm Haircut Look Like?
The “16mm all-over” haircut could also be called a 16mm induction buzz cut. The hair is trimmed evenly to the same length in all directions and dimensions.
It looks like this:

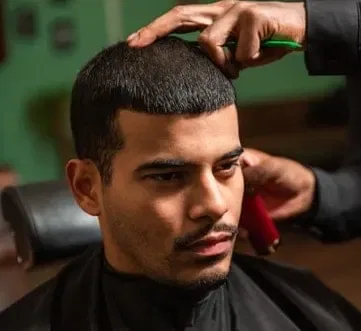
Although it’s a tidy-looking haircut, men often prefer to have the sides and back trimmed a little shorter than the top instead.
For example, keep the top at a #5 (16mm) with the sides and back at a #3 or #4. Keeping the sides shorter has a slimming effect on the face and also defines the jawline
It also prevents the hair looking too fuzzy and full at the sides as the hair grows longer. This can happen when the hair is simply trimmed evenly all the way around.
Another option would be to fade the sides and back, with the length gradually increasing as you go up toward the top.
In terms of styling, there isn’t a lot that can be done with 16mm’s worth of hair.
What you could potentially pull off is a very short quiff. Not all men will be able to and it partly depends on the texture of the hair.
A lot of men may have to wait until their hair grows to a #6 or #7 before they can really start applying some product and achieving anything.
Another option you’ve got with 16mm on top is a “high and tight”. Simply trim the sides and back down very short (either a skin fade, zero fade, or a #1) and don’t blend or fade it into the longer hair on top.
It’s this sudden transition between the sides/back and the top that gives it that distinct, disconnected look.
So, with this length, you’ll always be able to choose between the high-and-tight and the fade.
Overall, the 16mm haircut does give you a few styling options – definitely more than #1 to #4 buzz cuts.
But overall, you’re still pretty limited to very short hairstyles such as buzz cut variations or possibly very short quiffs.
The ease of maintenance and clean-cut, masculine aesthetic makes up for the lack of style choice, however.
How To Trim A 16mm Haircut In 6 Steps
All you need is a pair of electric hair clippers, a mirror, and a simple step-by-step routine.
A handheld mirror may come in handy for doing the back of your head too.
This routine is for a simple 16mm all over haircut. Remember, it’s often a good idea to trim the back and sides a little shorter – possibly a #4. But the principles and techniques you’ll learn here are the same.
1. Prime Your Hair Clipper
First up, you’ll want to prepare your clippers for the task.
A common mistake men make is using a clipper that hasn’t been charged, hasn’t been cleaned, and hasn’t been oiled.
It’s impossible to achieve a good trim with a clipper that hasn’t been primed properly.
You’ll want to make sure it’s charged. If it isn’t, the motor will slow down mid-trim and so will the blades. It’ll start to tug and pull, causing friction, irritation, and a terrible trim.
You’ll also want to clean around the blades using the tiny little brush that most clippers come with.
Plus, most clippers come with a tiny little bottle of oil. Apply this to the blades regularly to ensure they slide past each other with no friction.
2. Wash Your Hair
Before you start trimming, clean the hair. Greasy hair really doesn’t trim well.
Shampoo and wash it with lukewarm water before blow-drying. You need to make sure the hair is dry before going at it with your clippers.
Never use electric clippers on wet hair.
3. Trim The Top And Sides
Although you don’t have to trim the top and sides first, it’s generally best to leave the back until last because it’s a more difficult area.
For the purposes of this routine, let’s start with the sides.
Attach the #5 clipper guard (16mm) to the hair clippers and ensure it’s properly fastened. You definitely don’t want it coming loose mid-trim.
Choose what you want to do with the lever. It would probably be best to start with an open lever and then close it if you feel as though you want to go a little shorter.
Trim against the grain (i.e against the direction of hair growth). So, for the sides you’ll most likely be trimming upward, and for the top you’ll most likely be trimming backward.
Trimming against the grain is a great way to quickly and efficiently achieve an even #5 cut.
If you do feel as though the sides and back look too full when trimmed down to a #5 (16mm), you may want to consider trying a #4 or even a #3 here instead. It often looks more sleek when combined with a #5 on top.
4. Trim The Back Of The Head
The back of the head can be frustrating to get right. You’ll naturally have a lot of dips and grooves here – this makes trimming pretty difficult when you’re doing it yourself.
You want to try and get as even a trim as possible.
The fact that you can’t easily see the area doesn’t help either. You’ll want to make full use of your mirrors here if you’re choosing to DIY.
If you’ve got a handheld mirror, use it. Turn so your back is facing your bathroom mirror and hold your hand held mirror in front of you. Now, you should be able to see the back of your head reflected.
It isn’t ideal, but it’s better than nothing.
Start trimming the back. The good thing about a 16mm haircut is that it doesn’t need to be as perfectly tidy as a shorter one. You still want to get it as neat as possible, though.
If you can, use your 2nd finger to guide the #5 clipper guard across the dips and grooves to make it easier. Be careful not to press so hard that it slips off the blade.
5. Look For Uneven Areas
Now that the bulk of your trimming is done, take a look at your work from all angles – the front and both side profiles.
Try and make sure the lighting is as good as it can be when you do this.
Look for any obvious patches you’ve missed. These should show up as areas that look a little thicker, rougher, or darker.
Run your fingers through your hair to see if you can feel any areas that are uneven as well.
If you find any, trim them down.
6. Square Or Round Off The Neckline
This is probably going to be the hardest part to DIY. In fact, if you’re able to hold off on this altogether or wait until you’ve got someone to do it for you, do that.
The neckline is the lowest part of your hair at the back. It’s where your neck hair meets your neck skin.
You can choose to square it off or leave it rounded. You can even taper the edges to avoid a hard line if the person doing it for you is more confident (or a barber, of course).
At this point, you can safely say that you’re done. Step back and admire your work.
Rinse your hair and dry off.
Benefits Of The 16mm Haircut
If you’re thinking about going for a 16mm haircut, here are some benefits that may seal the deal for you.
- It’s easy to DIY – although the neckline may give you trouble, overall, a #5 clipper guard and a mirror is all you need to do it properly.
- Hair doesn’t look too thin. The scalp isn’t very visible at all at this length, unless the hair itself is especially thin.
- It’s effortlessly neat. This length really isn’t hard to keep tidy and sophisticated. It’s perfectly suited to professionals who don’t want to buzz down too short, but also want a length that’s easy to maintain.
- You won’t need to trim down too often. When you’re dealing with shorter cuts (eg. #0 or #1), you’ll need to trim down very regularly as even a few millimeters’ growth would be noticeable. With a 16mm cut, a bit of growth won’t be as noticeable and you could get away with longer periods in between trims.
Conclusion
It’s great because it’s simple.
Although you’re limited in terms of style, this length is appealing because of how easy it is to maintain and keep neat.
Enjoy.
Related Articles
Axel is the founder of ReadySleek and has spent over 5 years researching and testing men’s grooming products, skincare routines, and hair loss treatments. His work combines hands-on product testing with insights from dermatologists and trichologists to deliver evidence-based grooming advice.
He specializes in men’s skincare (including ingredient analysis of retinol, niacinamide, and SPF), hair loss science (minoxidil, finasteride, hair transplants), men’s fragrance (with 80+ colognes personally tested), and body grooming techniques.
When he’s not reviewing the latest grooming products, Axel focuses on making complex grooming topics accessible and actionable for everyday guys.