![4 On Top And 2 On The Sides: A Guide [Photos]](https://wwwreadysleekcom4f890.zapwp.com/q:i/r:1/wp:1/w:2400/u:https://www.readysleek.com/wp-content/uploads/2021/01/4-On-Top-And-2-On-The-Sides-A-Guide-Feature-Image.jpg)
There aren’t many combinations of words as regularly said to barbers as these ones. Instructions so clear that you breathe a sigh of relief as soon as they’re spoken. There’s so little that can go wrong. You’re about to learn everything you need to know about the 4 on top with 2 on the sides.
Induction-style buzz cuts where all of the hair is trimmed down to the exact same length in all areas have their place.
But trimming the sides down shorter than the top has its benefits, including slimming down the face, defining the jawline, and looking more attractive as it grows out.
Without further ado, let’s get to it.
What Is A 4 On Top With A 2 On The Sides?
It’s a hairstyle where the hair on top is trimmed down using a number 4 clipper grade (½ inch) while the sides and back are trimmed down using a number 2 clipper grade (¼ inch).
Here’s what it looks like:

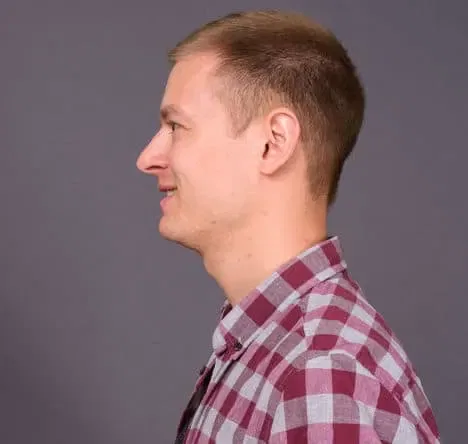
As you can see, the contrast between the sides and the top is noticeable but subtle.
It’s a great way to make a straightforward buzz cut just a little more interesting.
4 On Top With 2 On The Sides: Fades And Tapers
A 4 on the top with a 2 on the sides can be faded or tapered, where the sides and back gradually increase in length as you go from the top to the bottom.
It’s a really common styling effect and is a great way to make any buzz cut look a little more interesting.


It does require some technical skill with a pair of clippers and so is harder to do yourself.
The great blend of different lengths at the sides and back is what’s known as the “fade” effect and is what gives it its characteristic look.
When you’re tapering or fading a 4 on the top with 2 on the sides, one example would be starting with a #0 or a #1 at the bottom, before gradually blending into a #2 nearer the top of the sides and back.
Benefits Of The 4 On Top With A 2 On The Sides
Here are a couple of reasons why you may want to hop on this wagon and get one for yourself.
1. It’s Pretty Easy To DIY
More and more men are introducing themselves to the power of DIY trims.
Ultimately, getting to grips with a pair of clippers is really all you need to do. Assuming you aren’t attempting any DIY fades, you don’t need any fancy clipper chops to do a good job of it.
Although an induction buzz cut is by far the easiest trim to DIY, it gets boring. Trimming all of the hair down to the same, even length starts to lose its novelty after a couple of tries.
An easy and effective alternative would be to change up the sides and back.
In this example, you’d be trimming the top down to a #4 and the sides/back down to a #2. It really is that simple.
Yes, you could soften up the line where the two lengths transition by trimming a #3 here, but that’s also easy to get the hang of. Plus, you may find that isn’t even necessary in any case.
All you need is an extra couple of clipper guards, a little more time, and a little more effort.
You don’t need much – a basic pair of clippers will do. Although understanding how clipper guards work is important, the amount of knowledge necessary for this trim is pretty small.
There really isn’t a whole lot more to it. It may not be as slick or sharp as a barber’s trim, but it’s not hard to do a good job yourself.
2. It Slims Down The Face
Trimming the sides down significantly shorter than the top has aesthetic benefits as well.
The main one would be the slimming effect it can have on the face.
Let’s say you trimmed all of your hair (top, sides, and back) down to a #4. It’ll look fine, but it can have a sort of “fuzzball” appearance.
It may not be as noticeable when trimming down to shorter lengths like a #1 or a #2. But at a #4 length, it can be a problem – more so for some than others. It does depend partly on the texture and thickness of your hair.
What this does is make the head and face look chubbier and rounder than it otherwise would. It takes some definition away from your facial structure.
The best way of tackling the problem would be to trim the sides down shorter. This has a surprisingly significant impact.
What it does is make the jawline look more defined and the face look slimmer.
The larger the contrast between the top and the sides, the more obvious this effect. But some men don’t like the “top-heavy” appearance of having the sides looking much shorter than the top.
The 4 on top with 2 on the sides is a nice compromise where the contrast between the top and sides is subtle but still strong enough for this slimming effect to be noticeable.
3. It Grows Out Attractively
Growing out a buzz cut can be frustrating for some.
As I mentioned earlier, the “fuzzball” appearance of an induction-style buzz cut (eg. everything down to a #4) doesn’t exactly settle down over time.
In reality, it generally gets worse as the buzz cut grows out. That fuzzball appearance can get worse as the hair grows longer. The head looks rounder and you lose more and more definition.
This isn’t scare-mongering; it genuinely isn’t a big deal for a lot of men and for some it won’t even be an issue.
I’ve written about the number 4 buzz cut before and I’m a fan of it. But contrasting the length of the sides is (usually) more aesthetically pleasing.
By trimming down the sides to a #2 while the top is left at a #4, it’ll grow out looking more balanced.
Because of this, you could go for longer periods of time between trims. You won’t need to grab for that clipper and trim it down again as soon as you might have had to do if you’d trimmed everything down to a #4 instead.
It wouldn’t be a big deal having to do this, considering how easy it is to trim induction-style buzz cuts.
But having more time in between trims does mean it’ll pre-occupy less of your time, particularly if you’re doing it yourself.
How To Trim A 4 On Top With 2 On The Sides
Here’s a quick routine you can use to get the job done yourself. As I mentioned before, it probably won’t be as sharp or intricate as a barber’s trim.
At the end of the day, you’re (probably) not a professional, and magic shouldn’t be expected. You won’t be intricately fading or blending the #4 into the #2, but as the lengths aren’t that different from each other this shouldn’t be that big of a problem.
It wouldn’t be as harsh of a transition as going from a #4 on top to a #½ on the sides/back, for instance.
The #4 on top with #2 on the sides/back style is easy enough to do a reasonably good job of yourself. The transition between the two lengths shouldn’t be too harsh, hard, or obvious.
As you’ll soon see, the routine is pretty obvious, but having it all laid out step-by-step should make the whole process easier.
You won’t need much other than a pair of clippers, a bathroom mirror, and ideally a handheld mirror for getting the back done.
If you’ve got a buddy that can help you out with the back and the neckline, one of those would be great as well. If not, don’t worry – it’s possible to do it all by yourself. It’s just a bit harder.
1. Get The Clipper In Order
All you need is a reasonably good (not professional) pair of clippers that comes with a #4 clipper grade, a #2 clipper grade, and ideally a #3 clipper grade.
Essentially, most of them should, because these are some of the most commonly used clipper guard lengths in existence.
Here’s an example (
You don’t need anything fancy, but you’ll need a pair of clippers. Don’t use your beard trimmer to cut your hair (just an example).
Before every trim, charge, clean, and oil your clippers.
Charging it will ensure the motor is running efficiently enough to trim through the hair with minimal tugging and pulling. You’ll get the most even trim this way as opposed to trying to do it with a sluggish motor.
Oiling it with the little bottle of clipper oil it should have come will reduce friction between the blades, and once again lead to a better trim. There are alternative oils you could potentially use if it didn’t come with clipper oil.
Cleaning it really just means getting rid of as much old hair that may have clogged the blades. You can use an old toothbrush for this if your clipper didn’t come with a little brush to be used for this purpose.
2. Wash And Dry Completely
Clean the hair by rinsing it with or without shampoo. You don’t want to clip greasy hair because for one – it’ll be difficult to really know what you’re dealing with when all the hair is clumped together and looking thin.
Also, dirt/grease will obstruct the blade.
Once you’ve washed it, dry it completely. Either towel-dry and it allow it to airdry for long enough, or blowdry.
You shouldn’t use electric clippers on wet hair for safety reasons.
3. Trim Everything Down To A Number 4 First
Didn’t I tell you it was easy?
Before trimming the sides/back down to a #2, trim everything down to a #4 (including the sides and back). You’re “setting the stage”, you could say, by creating a nice and even platform to work on.
Once you’ve trimmed everything down to a #4, you’ll leave the top as it is and trim the sides/back down to a #2. But we’ll get to that step in a minute.
Attach the #4 clipper guard to the clipper blade and prepare for the trim. Trimming the top first is usually the best option.
Start trimming, against the grain. This means against the direction of general growth and on the top, this will mean trimming backward.
On the sides and back, it’ll be upward. Don’t forget the areas behind the ears.
Going against the grain like this is the most efficient way of getting a meticulously even trim.
The back can be tricky but using a handheld mirror should make it easier. Turn around holding the handheld mirror in front of you and you’ll be able to see the back of your head as it reflects off of the bathroom mirror.
4. Clip The Sides And Back Down To A Number 2
Now, the main question here is: how high up the sides and back do you want the number 2? Where do you want the transition from short to long to actually be?
My advice would be to keep the transition point low down on the sides/back and move it upward later if you feel as though you want it higher.
Using the eyebrow level would be a good starting point. Once you’ve trimmed a #2 up to this point, assess whether you want to go higher. If so, feel free to.
The problem with going too high to begin with is that you can’t really undo it. You could essentially go as high up on the #2 at the sides and back as you want, but you may end up with a sort of mohawk appearance you weren’t really aiming for.
Again, because the difference between a #4 and a #2 isn’t that much, it isn’t that big of a deal.
But starting low and going slow like this would be a good way of safeguarding yourself against the risk of ending up with something you weren’t aiming for.
Once you’ve trimmed the sides and back down to a #2 as high as you want it to go, take a look at the line at which the two lengths (#4 and #2) cross.
Is the line looking hard? Would you rather a more “blended” appearance here?
If so, go over that line with a #3 clipper guard if you want to. This should soften up this line and make the transition look less obvious.
It won’t be as fancy as a barber’s fade, but it’ll do the job.
5. Define The Neckline
As with all of my DIY trim tutorials, finish up by defining the neckline. This is the very bottom of the back of the hair.
At a #2 length, the neckline shouldn’t be too obvious and you could choose to leave it natural if you wanted.
However, in general, the cut will look a lot slicker if this line is sharpened up and defined using the lone blade of your clipper (with no guard attached).
In order to do this, a buddy would be preferable. Again, dealing with the back of your head is never an easy feat.
However, there are devices like neckline shaving templates (Amazon Link) that do make the whole process a lot simpler to do yourself.
Conclusion
There you have it. Everything you could possibly want to know about this glorious combination of lengths.
Whether you’re going to DIY it or simply looking for more information before instructing your barber, this guide should hopefully have served you well.
Enjoy.
Related Articles
- How to Get Rid of Dark Circles Under Eyes: Men’s Complete Guide
- Vitamin C Serum for Men: Why This Antioxidant Is Non-Negotiable
- Hyaluronic Acid for Men: The Complete Guide to Maximum Hydration
- Men’s Laser Hair Removal: Cost, Pain, and What to Expect in 2025
- Creatine for Men: Benefits, Dosage, and Side Effects (Complete Guide)
Axel is the founder of ReadySleek and has spent over 5 years researching and testing men’s grooming products, skincare routines, and hair loss treatments. His work combines hands-on product testing with insights from dermatologists and trichologists to deliver evidence-based grooming advice.
He specializes in men’s skincare (including ingredient analysis of retinol, niacinamide, and SPF), hair loss science (minoxidil, finasteride, hair transplants), men’s fragrance (with 80+ colognes personally tested), and body grooming techniques.
When he’s not reviewing the latest grooming products, Axel focuses on making complex grooming topics accessible and actionable for everyday guys.