The Number 4 buzz cut is a widely adopted favorite and for good reason. It’s a great “stepping-stone” hairstyle for men looking for the convenience of a buzz cut while enjoying the benefits of longer hair.
This article contains affiliate links. If you purchase through our links, we may earn a small commission at no extra cost to you. This helps support Ready Sleek.
There are many benefits to this length. The main ones would be its ease of maintenance, its suitability for men looking to “test the waters” with buzz cuts, and also for men with receding hairlines.
To think of it as a medium-length buzz cut would be appropriate, although there will always be those who may disagree. After all, one man’s “medium” is another man’s “short”, and so on.
Ultimately, it’s one of the most popular buzz cut lengths requested of barbers. But the beauty of it is that as with most buzz cuts, learning to DIY really isn’t too difficult either.
I’m going to delve deeper into why this style is so great. Then, I’ll run through a concise, step-by-step tutorial on how to get the all-over Number 4 buzz cut by yourself and from the comfort of your own home.
Let’s get to work.
Quick answer: A number 4 buzz cut is 13mm all over – the longest common buzz: texture, color and growth patterns all show, and it never exposes scalp. It doubles as the grow-out stage from shorter buzzes. Fade and combo versions live in the number 4 haircut guide.
| Guard | Length | The look |
|---|---|---|
| #3 | 10mm | The default buzz |
| #4 | 13mm | Fullest buzz, real texture |
| #5 | 16mm | Leaves buzz territory |
What Does A Number 4 Buzz Cut Look Like?

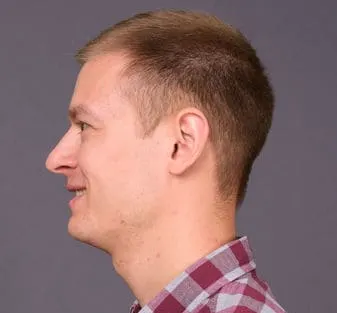
As you can see, “medium-length” would be a pretty accurate way to describe it.
To be more specific, the Number 4 buzz cut is ½ inch of length, which equals 13mm. That’s what the clipper guard will trim down to.
Of course, the term “buzz cut” is an umbrella term that refers to several different variations. What unifies them is the fact that they’re all short and heavily dependent on the use of a clipper. Here are the main ones:
- The Induction Cut – A military-style buzz cut with all of the hair trimmed to the same length. Top, sides, back – it’s all equal.
- The Crew Cut – The only difference is that the top is longer on the sides. Just how much longer can really vary, but it’s usually long enough to spike or slick to the side. It’ll usually be at least a couple of clipper guards longer than the sides.
- The Burr Cut – Think of this as the in-between of the two styles above. It looks more like an induction cut, but the top is still very slightly longer than the sides.
This article will focus on the Number 4 Induction Cut. In other words, a style where all of the hair is trimmed down to a Number 4 in all directions and dimensions.
It’s definitely possible to fade the Number 4 buzz cut, but that’s a more advanced tutorial that’ll probably be the topic of another article.
What’s great about the induction cut is that it’s easier to DIY. It isn’t hard to grab a trimmer, set it to our desired length and have at it. Of course, there’s a proper technique to doing this, as you’ll soon be finding out.
But before we get onto that, let’s go deeper into the benefits of this glorious buzz cut length.
The Benefits Of The Number 4 Buzz Cut
We’ve touched upon a couple of them already, but here they are fleshed out a little. If you were on the fence about diving head-first into the style, hopefully, this should give you the motivation to proceed.
1. It’s great for a first-time buzz cut
Getting a buzz cut for the first time can be a daunting experience. This is especially the case if you’re doing it yourself. When you go to a barber, at least you have the benefit of asking for their second opinion before committing to the act.
But either way, it isn’t an easy decision to make.
The main reason for this is that it’s very difficult to know exactly what you’d look like with a buzz cut. You could make a pretty reasonable guess, but it’ll never be very accurate.
Who knows what the shape of your hairless head would really look like without trying it out? That uncertainty can lead to a significant amount of anxiety in undecided men.
The reason a Number 4 works well is that it is a wonderful middle-ground. It isn’t as anxiety-inducing as trimming it down to stubble or even a Number 2. It’s a great way to dip your toe into the water and see what it’s like.
If you aren’t a fan, no big deal. It won’t take too long to grow back out to your usual length.
It’s subtle, smart, and intensely masculine. This length of hair will turn heads but will do so in a subtle and stylish manner.
That’s what makes it great for a first-time buzz.
2. It’s very easy to maintain
Growing out a buzz cut can be an awkward experience. There’s very much an “awkward phase”, much like when growing out a beard.
The reason for this is that hair doesn’t grow in equal lengths – some will grow faster than others. Buzz cuts, particularly induction cuts, will also grow out in all directions and dimensions like a ball of fuzz. No tapering, no nuances – it just grows outward.
This “tennis ball” appearance to a buzz cut as it grows longer can be managed in two ways. You can either taper the sides and back to give it a more natural appearance.
Or, you can trim it back down to a Number 4 again. I’d choose this option. The beauty of a Number 4 is that it’s long enough to not warrant needing trimming down that often.
With shorter buzz cuts, the growth of a few millimeters is a noticeable change. But with a Number 4, you could quite comfortably leave it for a few weeks before grabbing that clipper again.
But it’s short enough to make washing and drying very convenient as well. This is one benefit of shorter buzz cuts it manages to retain.
3. It’s good for balding men
Buzz cuts and receding hairlines go very well together. In fact, balding men around the world have looked to buzz cuts to give them relief when other styles start to fail them.
They work, and they work well.
The Number 4 buzz cut is great for men with receding hairlines and thinning hair on top. It’s long enough to minimize the amount of scalp on show, as well as to partially cover up the temples.
But it’s short enough to make the transition between the hair and the forehead less apparent. This is what makes a receding hairline less obvious with shorter hairstyles such as buzz cuts. The Number 4 is no different.
4. It’s long enough to style
Styling a Number 2 buzz cut, for instance, wouldn’t be possible. There’s just not enough length there to work with.
A Number 4 is long enough to experiment with. Using a light wax, gel, or pomade, spiking or slicking the hair to the side is definitely possible. In fact, it could be a phenomenal touch.
In a way, it makes it a little more interesting than shorter buzz cuts. You can vary the style now and again, even if it’s just a little bit.
The ability to make these subtle changes with your hair can have a significant impact on the shape of the face overall.
Ultimately, this does make this length more versatile overall.
How To Trim A Number 4 Buzz Cut
Knowing how to buzz your own hair is an excellent life skill to acquire. There may be a time when you’re desperate for a trim and for whatever reason, a barber isn’t available for the foreseeable future. Yes, it could happen.
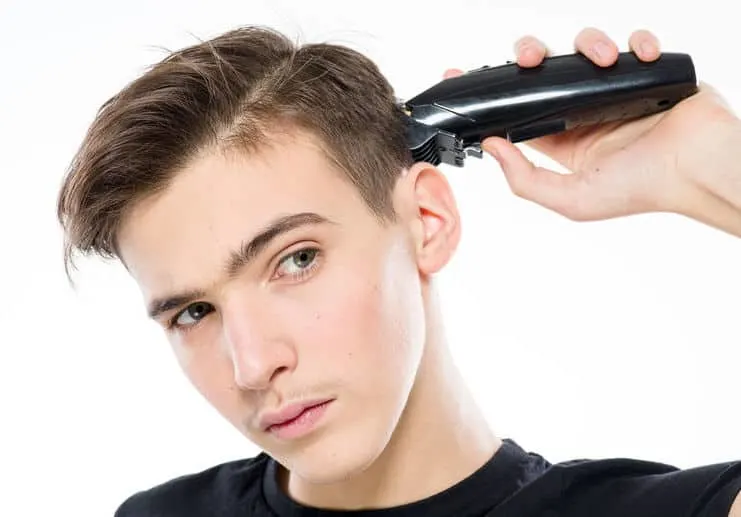
You’ve got a trusted pair of electric clippers. It’s time to put them to work. For this routine, you’ll obviously need a pair with a Number 4 clipper guard. But the beauty of it is, that’s pretty much all you’ll need.
Having said that, a handheld mirror would come in useful when doing the back. Let’s get to it.
1. Prepare your clipper and your surroundings
The vast majority of men will choose to do this in front of their bathroom mirror. It makes sense for so many different reasons.
The main hazards with this procedure are hairs clogging the sink, littering the bathroom floor, and subsequently an angry partner.
So, if you’ve got an apron or a gown you can wear, feel free to pop it on. I’d recommend laying some newspaper on the floor to allow for easy cleaning afterward.
Your clipper should be primed before starting the buzz cut. Most decent clippers come with a little brush to clear hairs out from around the blade, as well as some oil to lubricate it.
It’s also very important to ensure that the clipper is fully charged (if cordless) before starting.
Having a clean, well-oiled blade and a fully-charged motor will lead to a smoother, more even trim with less tugging and pulling.
Once you’ve done all that good stuff, carefully clip on the Number 4 (½ inch or 13mm) guard and brace yourself for the magic that’s about to unfold.
2. Start trimming the top and sides
Before we go any further it’s important to emphasize that it doesn’t really matter where you start trimming from. That’s another great benefit of this incredibly simple style.
It’s up to you whether you start trimming the top, sides, or back first. For the purposes of this tutorial, let’s assume you start with the sides, then move onto the top, and then the back.

At this point, you’ll also want to decide what to do with the lever. Push the lever forward (closed) and you’ll trim shorter than if you were to leave the lever pushed back (open). If you aren’t sure, leave it open for now.
That way, if you find you want it a little shorter you can always close it to get a closer trim.
So, turn it on, and start trimming the sides.
Throughout this cut, you’ll be trimming against the grain. In other words, against the direction of hair growth. If the hair on the sides is growing downward, you’ll be trimming upward.
The hair behind the ear can be tricky to get to. Gently pull the ear backward and forward to let you reach these hidden parts.
Be sure to gently shake off any hair accumulating on the clipper guard to prevent it clogging and eventually tugging, pulling, or even stalling.
Once you’ve done the sides, shift your attention to the top. Once again, go against the grain at all times. This will be much quicker and will also give you a more even cut.
If the hair is growing forward, you’ll be trimming backward. Easy, right?
Once you’ve finished with the top, it’s time to start on the back. The back can be a little trickier, but it’s still pretty easy to get the hang of.
3. Trim the back
Trimming the back is much easier if you’ve got a second, hand-held mirror. That way, you can turn around, hold the handheld mirror in front of you and see the back of your head in the bathroom mirror.
Again, trim against the grain and try to make it as even as possible. There are two things which make the back harder to do – the dips and grooves, as well as the crown area.
To combat the dips and grooves on the back of your head, you really just have to be patient. Don’t be tempted to skim over them. Really take the time to ensure you’re paying every inch the attention it deserves.
You can gently place a finger on the edge of the guard to help guide the clipper across. Be careful not to press too hard, or you risk pushing the guard off and exposing the naked blade to the scalp. As you’d expect, this would completely ruin the cut.
Try switching hands if you’re finding a particular area awkward to maneuver around.
The crown area is awkward because hair tends to grow in different directions. Run your fingers through and around it to try and judge what direction the hair is growing in and trim it accordingly.
4. Look for uneven areas
You’re pretty close to the finish line now. It’s time to sharpen things up.
Inevitably, there will be patches that you’ve missed or forgotten about. These can be quite subtle and easy to miss if you aren’t looking for them.
Take some time to make sure there aren’t any patches that look a little longer. They generally show up as a slightly darker shade than the rest of the buzz cut.
What we’re aiming for is a Number 4 length all over. We’re trying to minimize the number of hairs that manage to escape the cut.
Try tilting your head forward and backward and looking in the mirror to see whether there are any areas that show up when looking from different angles.
Use the second, handheld mirror to properly review the back in the same way. The back of the head is usually the main culprit for uneven patches.
Rub your hand over your head trying to feel for any areas that feel uneven. You’d be surprised by how some uneven areas you may not be able to see, but you can certainly feel them.
Finally, pay close attention to the frontal hairline area. Especially in men with lighter shades of hair, it can be easy to miss little hairs on the hairline itself. Go over this area a few times to make sure it all gets an even treatment.
5. The neckline may need squaring or rounding off (optional)
This is the only part you may need some assistance with. Whether or not you choose to do it really depends on personal preference.
If you’d like a neater looking neckline, you may want to define the border using the naked blade of your clipper. You may potentially want to shave under this neckline afterward for perfect results.
Many men are perfectly happy not doing this and don’t mind a more natural-looking neckline. It’s up to you whether you choose to do this.
You may even be able to do it yourself, but be careful not to trim into the bulk of the hair itself. You’re simply sharpening up the border here.
6. Shower time
Jump in the shower and wash off any excess hair. You’re done.
Towel-dry your buzz cut and admire your work. It may take some time to get used to your new look, so try not to judge it negatively too soon.
A lot of men are pretty relieved when they finally finish their buzz cut, particularly their first one.
Hopefully, you grow to like this style so much that you’ll be returning to this simple routine time and time again.
Conclusion
It’s a length of buzz cut that is massively growing in popularity, as more and more men are looking for something sleek, stylish and yet incredibly convenient.
Convenience is becoming a huge part of grooming in general. Style doesn’t have to come at a cost. Incessant pruning and preening in front of a mirror doesn’t appeal to a lot of men.
Sometimes, you just need a way of making a fashion statement but doing so in the quickest and most efficient way possible.
🏆 Recommended Grooming Tools
- Philips Norelco Multigroom 9000 — Best overall trimmer for beard & hair
- Philips OneBlade 360 — Best budget trimmer & shaver
Written & Fact-Checked By
The Ready Sleek Team
Grooming obsessives since 2019. Evidence-based advice you can trust.
Frequently Asked Questions
Is a number 4 still a buzz cut?
Just – 13mm is the upper edge of buzz territory. It reads as intentional short hair rather than a clipper job, which is exactly its appeal.
Does a number 4 buzz need any maintenance?
A monthly re-buzz keeps the shape; between cuts it needs nothing. It is the best buzz for men who want minimum effort without the shaved look.
Which is better for thinning hair – number 4 or shorter?
Shorter. At 13mm, thin patches contrast with dense areas; a #1-#2 evens the appearance out. See our buzz cuts for thinning hair guide.
Axel is the founder of ReadySleek and has spent over 5 years researching and testing men’s grooming products, skincare routines, and hair loss treatments. His work combines hands-on product testing with insights from dermatologists and trichologists to deliver evidence-based grooming advice.
He specializes in men’s skincare (including ingredient analysis of retinol, niacinamide, and SPF), hair loss science (minoxidil, finasteride, hair transplants), men’s fragrance (with 80+ colognes personally tested), and body grooming techniques.
When he’s not reviewing the latest grooming products, Axel focuses on making complex grooming topics accessible and actionable for everyday guys.