You’re about to learn how to shape stubble like a consummate professional, all from the comfort of your own home.
It isn’t difficult. That’s why stubble is so great – there isn’t much pruning or preening. You don’t need to spend hours in front of the mirror to make it look presentable.
What’s the “classic” stubble style you’re about to learn?
The “classic” stubble style is usually the first style that comes to mind when the word “stubble” is used.
Just to clarify from the outset, “stubble” simply refers to a very short facial hair length. Specifically, a length between 0.4mm and 5mm.
Stubble can be styled in many different ways. For example, the goatee styles, chin straps, the stubble n ‘stache and so on.
The “classic” stubble style is the most popular, most recognizable, and arguably most versatile. It’s seen everywhere from the red carpets of Hollywood to the everyday workplace.
The style simply refers to a mustache, hair on the cheeks, chin and upper neck, plus or minus a soul patch. Of course, trimmed down to a traditional stubble length (0.4 – 5mm) and with carefully defined borders.
If it isn’t groomed and shaped properly, however, it can quickly be construed as messy and unkempt.
Fortunately, you’ll never have that problem. Not after reading this guide on exactly how to shape this style with no trouble.

How to shape a classic stubble beard step-by-step
Shaping stubble is easiest to explain broken down into its core components. Over time these steps will become second nature and will easily be integrated into your morning routine.
Step 1: Grow it out or trim it down
The specifics of this step are determined by the length of stubble you’d like to end up with.
The objective is to get your facial hair to approximately 2mm longer than the stubble length you want, before starting to shape it.
We want the facial hair at a workable length before trimming and neatening it up. It’ll also allow us to assess the contours your facial hair follows in its longer form.
If you aren’t sure of how long this is, don’t worry. You will learn over time. For now, just grow it without trimming it for around 12 – 14 days. This should give most men approximately 6mm of growth, although of course, it does vary between men.
If you’re rocking a longer beard, that’s simple. Just grab your electric beard trimmer and trim down to 2mm longer than the length you want, or alternatively, to 6mm.
Your stubble beard will now be primed for perfecting. The stage is set.
Step 2: Trim the entire beard
Now that your facial hair is at a workable length, it’s time to trim it down to the stubble length you want.
Grab your stubble trimmer or beard trimmer and set it to the size setting you want.
When determining exactly how to shape stubble the way you want, you need to find your optimal stubble length. In other words, the length which suits your face best.
It’s useful to differentiate stubble into light (1-2mm), medium (3mm) and heavy (4-5mm).
This may be determined by factors other than aesthetics. For instance, some workplaces may not allow heavy stubble, but light stubble may be considered perfectly professional.
If you aren’t sure what your magical, optimal stubble length is, trim down slowly in 0.5 – 1mm increments. Trust me, once you find the right length for you, you’ll know it.
Trim your entire beard. Everything you can see.
Variating the length slightly by 0.5 – 1mm is very commonly done to compensate for less thick areas.
For example, the cheeks are often patchier than the chin and mustache. Leaving the stubble 0.5 – 1mm longer here may make this less noticeable.
Beard hairs are notorious for growing in all sorts of directions. It is often necessary to vary the angle at which you hold the trimmer in order to catch the more elusive hairs.
Step 3: Define the neckline
The neckline is simply the border between your beard and your neck skin. The dreaded “neckbeard” refers to an untamed layer of hair that grows when a neckline is left to stray. It looks scruffy, shabby and unkempt.
A well-defined neckline that wraps nicely under the jaw can give the jawline an excellent definition. It makes a stubble beard look a lot sharper. When learning how to shape stubble, this should be a priority.
The way to find and trim your “perfect neckline” is as follows:
- First, tilt your head up to see your whole neck in the mirror.
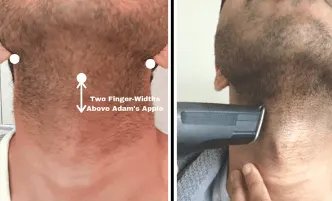
- Place your second and third fingers horizontally above your Adam’s apple. This should give you a point “two finger-widths” above your Adam’s apple, which will form the lowest point of the neckline.
- Now visualize a U-shaped curve that runs from earlobe to earlobe, passing through this point above your Adam’s apple. Allow the curve to slant upwards in each direction, almost following the angle of the bottom jaw. Be careful not to allow it to become too “V-shaped” though.
- Outline this line and trim everything beneath it as short as it can go.
What you’ve just visualized and trimmed, my friend, is your neckline.
Using this method, you’ll ensure that your neckline isn’t positioned too high leading to a jarring double-chin effect.
This is particularly evident when you open your mouth wide. If your neckline is above your jawline, you’ve done something wrong.
Don’t worry, we’ll be shaving everything beneath the neckline later on to give it a crisp, sharp edge.
Step 4: Shape the cheek line
Moving swiftly on to the equally important cheek line. The cheek line is the border between your beard and your cheek skin. In other words, the northern border of your stubble beard.
Although this tutorial is on how to shape stubble, it’s important to bear in mind that the cheek line can be left natural. A crisp, sharp cheek line isn’t everyone’s personal preference. Some prefer a few scraggly hairs as it looks more “laid back”. If this is you, not a problem. The advantage is that it requires less upkeep.
But if you did want to define that cheek line, follow these general steps to ensure you don’t set a foot wrong. Remember, it’s usually best to follow the contour of your natural cheek line, and just accentuate it.
- Visualize a line leading from the bottom corner of your sideburn (i.e where it meets your beard) to the corner of your mouth. This is an outline for your cheek line.
- Trim all of the stray hairs above this line. This in itself would be a perfectly acceptable cheek line.
- Your natural cheek line may have a curve to it and so won’t be a perfectly straight line. That’s fine. Just trim any strays above this curve.
Step 5: Shave outside the borders
Some men leave it at that. They’ve trimmed their beard down to their stubble length of choice, neatened up the borders, and trimmed down everywhere else using the naked blade.
Sure, this might be enough.
But to really take the look to ultra-debonair heights, it’s extremely important to shave outside the borders. In other words, beneath the neckline, and above the cheek line.
Step 6: Moisturize
The trimming and shaving are done. You’ve learned how to shape stubble and sculpt it to perfection.
Use a thoroughly hydrating moisturizer on the face and neck after your shave.
Ready Sleek founder. Obsessed with casual style and the minimalist approach to building a highly functional wardrobe. Also a fan of classic, vintage hairstyles.

